

21st Century Incubator - How It's Made
11 June 2017In the previous post, I gave an intro to what an incubator is and why we need a 21st century version. Check it out if you haven't yet: 21st Century Incubator - Part 1 - Intro
In this part, we will go over how this incubator is made and what are it's unique elements
Inside
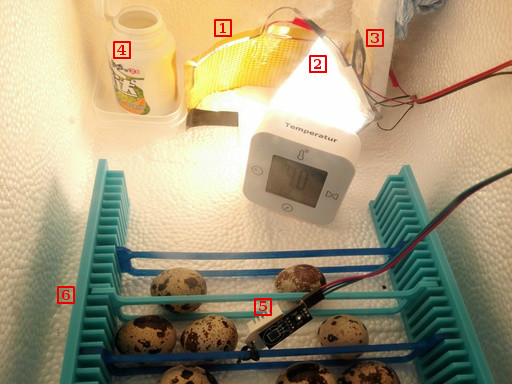
The inside of the incubator is surprisingly very standard. There have been dozens of guides on creating an incubator and most, if not all have the same setup.
1. Heating Pad
Used as a heat source. This was supposed to be enough warmth for the incubator, however it fell short, so a secondary heating source was also needed when temperature needs to increase quicker.
2. Bulb
These get very hot and are able to increase the temperature inside the box to 37.5 °C in a matter of minutes.
3. Fan
The fan is used to circulate the air throughout the box so that temperatures are roughly the same at all points in the incubator.
4. Water container
The high temperatures causes the water to slowly evaporate, creating humidity.
5. Sensor
High accuracy temperature and humidity sensor. It can read temperature with an accuracy of +/- 0.1 °C. For a steady incubation temperature, the sensor's accuracy is crucial as it determines how quickly the heating can react to temperature changes.
6. Egg turning system
This consists of a tray that can be separated into partitions using the dividers. The tray sits between 2 guide lines and a motor attached to the head of tray moves the tray forward and backward every hour. Eggs confined within the divided space roll.
The egg turning tray was 3d printed.
The rest of the monstrosity
What I'm using here is a prototype board, which facilitates the connections between the different components.
Outside
Outside is more interesting
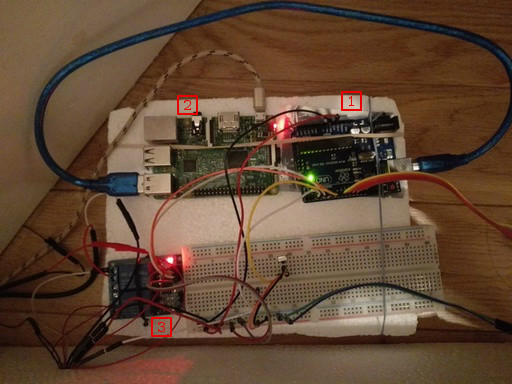
1. Arduino
The main controller of the incubator. This is an open source hardware and software bundle that has the majority of the elements you would need for any electronics project onboard.
The main purpose of the Arduino is to periodically collect information from the sensor and decide what to do with the heating elements (pad and light). It also moves the tray via the motor once per hour.
2. Raspberry Pi
Similar to an Arduino but this can be a full computer if needed. Unlike the Arduino, it comes with a WiFi chip, usb and HDMI ports.
The Raspberry Pi is connected to the Arduino via the serial line.
Why do we need another device when the Arduino is there?
- The Arduino does not have WiFi capability built in - We want to send information of the incubator's state to the web.
- An extra layer of control and monitoring - If the Arduino were to fail in any way, the Pi would be there to know and potentially fix the issue as well.
- More processing heavy tasks - The arduino can only run a single application at a time. Anything above the very basic functionality of the incubator has to be done on the Pi.
3. Relay
A relay is a mechanical switch that can be turned on and off from the hosting device (Arduino). This is used as a mechanism for turning on and off the heating elements to control the temperature.
The relay is needed because the Arduino is not able to run high power devices such as the heating pad and bulb by itself hence they need to be connected to separate power supplies and switched off board.
I know what you are thinking right now. "This is the exact same as my <brand> incubator. What's the deal smart ass?"
Unlimited potential
The Arduino has a microprocessor which can be programmed to control many inputs and outputs.
While what has been demonstrated so far is standard functionality, the potential with what can be added on top is immense. Here's just a few examples of what I have managed to add on so far:
- Send stats to the web - Stats such as temperature, humidity, egg tray position are sent to a database for archiving, monitoring and alerting. Read on for more details of this.
- Adjust Temperature - An infrared remote is able to adjust the desired temperature inside the incubator.
- Disable Light - You can also choose to enable or disable the use of the light bulb if the heating pad provides enough temperature.
- Stop the turning tray - The egg turning system can be disabled. This is very useful as eggs need to stop turning a few days before hatch.
- Adjust the turning tray - The turning tray can be adjusted in position.
With a little effort, the following could be added as well:
- Fully remote control - The remote control makes use of infrared so you have to be in close proximity to the incubator. Due to the incubator being internet connected, the commands could easily also be accepted through the web connection allow you to control the incubator from anywhere.
- Camera - A camera module could be connected to the incubator. Again, as we are internet, connected you could watch your incubator for those nervous times from the comfort of your chair at work!
By far the most useful and interesting feature is that all information regarding the incubator is stored online and can be queried in real time. The next part is dedicated to this so read on to Part 3 - Monitoring and Alerts.